The world is heterogeneous, comprised of people belonging to different regions who speak different languages. Now when you run a popular site that is visited by users from all across the world, you must make sure that you have a diversity in your operational language as not everyone in the world can understand English. This diversity can easily be achieved by simply translating the context in the required language, which can be done by simply using Google Translate. We also visit hundreds of sites that are not English for example French, Chinese, Russian, Spanish etc and thus, we use the same tool to understand, if not all at least a bit from the context but it helps though.
 As per the requirement of this tool, we found a way of adding a Google Translate Button in your blogger that could make it a multi-language site somehow if not precisely.

Step 2: On clicking the big blue button, you’ll be taken to another page where you’ll have to add the website details on which you want Google Translate Button to be installed. Enter the URL of your site i.e. http://blog.templateism.com is in our case and select the basic language of the site from the drop down menu. When you are done, click next.
 Step 3: Now, the page you find yourself next is all about the customization of Google Translate Button. It provides vertical, horizontal and drop-down format of the Translator. Also, it gives an option to select the languages in which you want the content to be translated, thus choosing “All languages” would be optimum but you can specify if you want fewer languages by simply clicking “specific languages”. When done, click on “Get code”.

Step 4: Now you see 2 different codes. The first verifies the very existence of your Translate Button and the second one enables you to do the positioning of the button anywhere you want on your blogger.
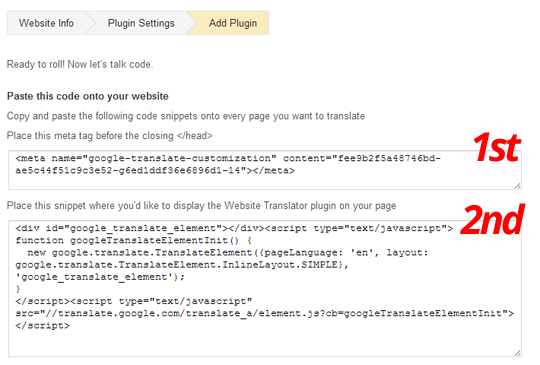 Now, follow these steps to get the Button on your site:
Adding the Google Translate Button
Step 1: The first thing you need to do is go to “Google Translate Management page” and make sure that you are already logged in to your google account. If you are, then just click on the big blue button that carries “Add to your website now”.- Copy the first code and then go to Blogger>>Template>>Edit HTML>> Search for </head>, and paste the code just above it. Once done, save the template and proceed.
- Now copy the second code and paste it anywhere on your site to get the Translate Button in your blog. What we prefer is to add it in your sidebar so that no page of your site gets left out of it. Go to Blogger>>Layout>>Add a Gadget>>Add HTML/Javascript and then paste the code in the HTML portion and save the widget.
دانلود آهنگ جدید
ReplyDeleteدانلود آهنگ جدید
دانلود آهنگ جدید
This is extremely helpful info!! Very good work. Everything is very interesting to learn and easy to understood. Thank you for giving information.
ReplyDeleteCar Restoration 3D for PC
موزیک روز دنیا ایوان باند
ReplyDeleteامو باند
موزیک روز دنیا
هوروش باند
After you have taken a decision to get an Quick 400 Dollar Loan, you are going to be offered to fill out an application form and in case it has been confirmed you will sign a loan agreement where there is a due date of your repayment.
ReplyDeleteThis reminds me of a well neat tutorial i just had seen recently. It was about Quickbooks File Doctor and its benefits.
ReplyDeleteGoogle Translate has not been useful to me in terms of blogging, but it has done me wonders in terms of academics. Being a Japanese citizen, studying in UK and doing assignments in the language of high standard. I used Translate to help me out to write my college assignment, but I think I needed more help than this.
ReplyDeleteI am already using google translation because it helps me to translate the content that I was feeling very difficult because I have to answer some questions. dissertation writing services
ReplyDeleteفرش ها در دونوع ماشینی و دستبافت تولید میشوند . قالی یا فرش دستبافت به نوعی محصول نساجی گفته میشود که از الیاف پنبه ، پشم ، کرک و ابریشم با هنر دست بافته میشود . از بین بردن زردی فرش در اثر سوختگی کاربرد قالی یا فرش دستبافت به علت ارزش و بهای زیاد آن عموما تزیینی ست و در برخی موارد و فضاهای لوکس شاهد آن هستیم که از این محصول برای پوشش زمین و به عنوان کف پوش استفاده میشود .
ReplyDeleteI am of the same opinion – I believe the best way to handle essays is to outsource them to an expert. So, here is what I do whenever I have an essay to deal with – I go to https://eazyresearch.com/ and place my order. Simple – no hassle at all.
ReplyDelete
ReplyDeleteWhen I originally commented I clicked the “Notify me when new comments are added” checkbox and now each time a comment is added I get three emails with the same comment. Is there any way you can remove me from that service? Thanks a lot!
Red Suit
I wanted to thank you for this great read!! I definitely enjoying every little bit of it I have you bookmarked to check out new stuff you post.
ReplyDeleteAirport Transportation Orlando
This was really an interesting topic and I kinda agree with what you have mentioned here! mytv enter code
ReplyDeleteI enjoy reading your articles.
ReplyDeleteI'm looking forward to reading your blog again.
Rjackets
This is a really awesome and helpful article for me. I really appreciate your work for providing such useful information, thank you so much! Raed more: confectionery products suppliers
ReplyDeleteThis comment has been removed by the author.
ReplyDeleteI must say that that you are doing a very nice job here in this fantastic blog. just keep it on, you are good. EUI post utme past questions pdf
ReplyDeleteI merely picked up your blog post a couple weeks ago i have actually been perusing this tool always. An individual has a lot of helpful tips at this point we absolutely love your lifestyle of a internet sites actually. Stick to the nice perform! Bandar Slot Terbesar
ReplyDeleteWhen I originally commented I clicked the -Notify me when new comments are added- checkbox and now if a comment is added I receive four emails concentrating on the same comment. Perhaps there is any way you may remove me from that service? Thanks! Sewa Bus Jogja Murah
ReplyDeleteI am happy to find your distinguished way of writing the post. Now you make it easy for me to understand and implement the concept. Thank you for the post. Sewa Bus Jogja Murah | Sewa Mobil Jogja Lepas Kunci
ReplyDeleteWhen I originally commented I clicked the -Notify me when new comments are added- checkbox and now if a comment is added I receive four emails concentrating on the same comment. Perhaps there is any way you may remove me from that service? Thanks! Jadwal Kapal Pelni | Jadwal Kapal Pelni Terbaru
ReplyDelete
ReplyDeleteI truly welcome this superb post that you have accommodated us. I guarantee this would be valuable for the vast majority of the general population. Jadwal Kapal Pelni | Jadwal Kapal Pelni Terbaru
学術翻訳 Thank you because you have been willing to share information with us. we will always appreciate all you have done here because I know you are very concerned with our.
ReplyDeleteVery good... Stunning... I'll bookmark your site and subscribe to your RSS as well... I'm glad to find so much important information in this article; we need to develop more strategies in this area, so thanks for sharing.original leather jacket
ReplyDeleteThanks for this amazing tip. Checkout Private Label Skin Care Manufacturers and let us know what you think about it.
ReplyDeleteHundreds of thousands of Quickbooks users all over the world rely on the Quickbooks file doctor tool to diagnose and fix a wide range of sophisticated faults that occur when multiple users attempt to work on the same company file at the same time. While utilising or attempting to use a QuickBooks company file, this tool can help diagnose network, multi-user, and a variety of other issues.
ReplyDeleteOnly QuickBooks 2016 and later editions have this feature incorporated or built-in. To upgrade QuickBooks to the most recent version, go to the quickbook file doctor download page on the Intuit website and follow the instructions.
ReplyDeleteYour blog is very useful for us. Thank you for sharing this information with us. Quickbooks is accounting software used in many organizations but sometimes users face some errors. Here is complete guide for Quickbooks error 3371 .
ReplyDeleteOne of the most typical errors seen by QuickBooks users is Quickbooks error 80070057, which specifies that the parameter is wrong, especially when the company file is accessed. This error code means you don't have sufficient authorization to remove the files.
ReplyDeleteThis is a really awesome and helpful article for me. I really appreciate your work for providing such useful information, But I am looking for someone to Write My Assignment For Me I will pay them for it. Thank you for this post also.
ReplyDeleteSangat sederhana untuk mengetahui topik apapun dibandingkan dengan buku, seperti yang saya temukan di situs ini.
ReplyDeletehttps://www.safecasinosite.net
Quickbooks update error 15106 happens when the update program cannot be opened or when the update program is damaged when updating QuickBooks Desktop.
ReplyDeleteIf u have any issues contact our certified QuickBooks experts team for more information visit our site.
ReplyDeleteQuickBooks Connection Diagnostic Tool
Emaar presents the Elie Saab II at Arabian Ranches III, offering luxury 4 and 5 bedroom villas designed by international fashion icon Elie Saab.
ReplyDeleteI found that site very usefull and this survey is very cirious, I ' ve never seen a blog that demand a survey for this actions, very curious... cbd patches wholesale
ReplyDeleteOur experts have excellent knowledge and a serious of skill sets in diverse academic subjects. If you are looking for quality Write my thesis
ReplyDeleteIt is a great website.. Delhi Massage Service The Design looks very good.. Keep working like that!
ReplyDeleteSuch a very informative site, thank you for sharing!
ReplyDeletewww.excavationdoneright.com/excavation-indianapolis
Thanks For Sharing Such An Amazing Post Enjoyed Reading it.
ReplyDeletePatient Portal Login
Cathay Pacific Airlines 24-Hr Cancellation
ReplyDeletePertaining to the 24-hour cancellation policy of Cathay Pacific, you can make the reversal of your ticket for free. The span of this 24-hour period allows you to cancel your flight reservation without paying a single cent as a cancellation fee. Moreover, by reversing this span, you can acquire the full amount of your flight ticket as a refund.
One more condition under this section is that you must maintain the time limit of 7 days, which means that the gap between the cancellation and departure date is 7 days. Besides, this policy doesn't work in any of the partnered airlines. By canceling in 24 hours, you can receive benefits like simple cancellations and easily get your refund money.
That was so amazing. My Nordstrom Account
ReplyDeleteThank you for providing information about google translate. There is something you might be interested in. Check this
ReplyDeleteGreat! I was searching about real estate projects like on internet, while I suddenly land on this page and just read the whole blog and found it interesting and helpful. Thanks for sharing.
ReplyDeleteGulberg islamabad investment opportunities
Exploring gulberg islamabad complete guide
Property in Pakistan comprehensive guide
Real estate investment
Gulberg islamabad guide
Such a very informative site, thank you for sharing!
ReplyDeleteUSPS LiteBlue: Streamlining USPS Employee Services
Will Smith And Jada Pinkett Smith: A Brief Introduction
Steve Eisman Net Worth
Atlanta Rapper Archie Eversole Net Worth
George Anthony Net Worth: A Journey Of Success And Philanthropy
Thanks for the info.. UPSer
ReplyDeleteThank you for this article. YourTexasBenefits Application
ReplyDeleteThis is very good tip for everyone. Million of people using google translator all around the world. You notified an important information in this blog. Admirable effort. Now it's time to avail Jupiter Florida Airport for more information.
ReplyDeleteWhile Google Translate and similar tools can be convenient, it's important to note that they might not always provide accurate translations, especially for complex heic to jpg or context-dependent content. The quality of translation can vary widely between languages and the complexity of the text being translated.
ReplyDeleteThat was so great I loved that. Ball Sports Pro
ReplyDeleteThank you for sharing such an insightful post. The amount of research and effort that went into this is evident, and it's greatly appreciated. Looking forward to more informative content from you!
ReplyDeleteBuy Larger Handcrafted Scented Soy Candles online in Perth
New York Divorce Law No Fault
ReplyDeleteThis guide provides a step-by-step guide on adding a Google Translate button to a Blogger website, making it accessible to bloggers of all skill levels. It includes code snippets and visuals to enhance user experience. However, it could benefit from a troubleshooting section to address common issues during installation. Overall, this resource is valuable for improving a Blogger site's accessibility to a wider audience.
The 3D Text Logo Animation Design, created using Aurora3D Software, is a visually stunning and dynamic tool that enhances the depth and dimension of logos, making it an excellent choice for businesses.Preliminary Conference Divorce New York
ReplyDeleteIntegrating a Google Translate button into your Blogger blog enhances accessibility and user-friendliness for a global audience. The simple installation process allows visitors to easily translate your blog into their preferred language, making it more inclusive and user-friendly. This tool breaks down language barriers and broadens the reach of your content, making it a practical and user-focused enhancement. Hudson County reckless driving attorney
ReplyDeleteThanks for sharing this information UPser Login
ReplyDeleteWhat a well-crafted and thoughtful piece!
ReplyDeleteinformatica BDM certification training
Thanks for this great information.
ReplyDeleteliteblue login
liteblue
liteblue epayroll
liteblue Postalease
Thanks for such an informative content as the effort put by the author in this is really amazing. minitab online training
ReplyDeleteظروف يکبار مصرف يکبار مصرف آراسته به طور کلي، شامل بشقاب، ليوان، ظرف بستهبندي يکبارمصرف و… است و عمده دليل استفاده از آن، به ويژه ظروف گياهي و دوستدار محيط زيست (Eco-Friendly Plate) در مراکز پذيرايي و رستورانها، امکان بازيافت سريع آنها و همچنين کمپوستپذيري آنها است.
ReplyDeleteThank you for providing me with a detailed Verified Complaint for a New York divorce. It's a useful tool for those navigating the intricacies of divorce processes because of your attention to detail and concise explanation of the legal grounds. It's great that you're dedicated to giving factual information, and you clearly know the ins and outs of New York divorce law. We appreciate you providing such a useful tool to assist people in navigating this difficult process. Verified Complaint New York Divorce
ReplyDeleteThanks for this information great blog.
ReplyDeletejoin pd.com
Com uma ampla variedade de extensões e plugins disponíveis, scarlet baixar 2024 permite aos usuários estender ainda mais as capacidades do navegador de acordo com suas necessidades específicas. Desde bloqueadores de anúncios até ferramentas de produtividade e personalização da interface, há uma extensão para praticamente tudo, oferecendo uma experiência de navegação verdadeiramente personalizada.
ReplyDeleteGreat tutorial! I followed the steps outlined in the article to install the Google Translate button on my Blogger site, and it worked seamlessly. The clear instructions made the process easy, and now my blog is more accessible to a wider audience. Thanks for sharing this helpful guide!
ReplyDeleteDigital Marketing Company in Sharjah
It's fantastic to see a commitment to linguistic diversity in online platforms! Embracing translation tools like Google Translate ensures inclusivity and accessibility for users worldwide. This approach not only facilitates understanding across languages but also fosters a sense of global community. Kudos to your efforts in promoting multilingualism on your site!
ReplyDeleteRegistro Central Violencia Doméstica Nueva Jersey
Orden Protección Nueva Jersey
Thanks for sharing wonderful article. bankruptcy lawyers around me
ReplyDeleteThis is very good tip for everyone. Million of people using google translator all around the world. applydiscoverit.com
ReplyDeleteFrom relaxation to pain relief, female to male massage in chennai therapists work to address men's health concerns
ReplyDeleteTake a moment to reflect on your practice and set intentions for your next practice, so once come to massage in hyderabad center and take services of your choice
ReplyDeleteUpon successful activation, the mydashcard login portal welcomes you to personalize settings, ensuring your financial toolkit is tailored precisely to your specifications.
ReplyDeleteInstalling Google Translate button on your blog can increase accessibility and range of your blog a lot. Through your guide, people will be able to fluently translate content into various languages, which will allow them to reach a greater audience. This option is especially helpful for those platforms like Best Dissertation Writing Service Uk, where international clientele look for educational support in their native languages. The guided instructions in your blog provide website owners with a tool to overcome the language barriers and communicate with the diverse audience in a more effective way. Thank you for giving helpful tips on how to improve the website.
ReplyDeleteOur therapists are professional and discreet, ensuring a comfortable experience. b2b massage in bangalore
ReplyDeleteCMOLDS is the premier mobile app development company in uae, offering innovative solutions tailored to your business needs. Our expert team excels in crafting cutting-edge mobile apps that elevate your brand's presence in the dynamic UAE market. Partner with CMOLDS for unparalleled expertise and transformative digital solutions.
ReplyDeleteTo provide a helpful review comment on entertainment media, it would be useful to know which specific piece of media you're referring to. Whether it's a movie, TV show, book, video game, or another form of entertainment, each has its own unique aspects that can be evaluated. Could you please specify the particular entertainment media you'd like to review? Once I have more information, I'd be happy to assist you with a review comment
ReplyDeletepreliminary protective order in virginia
Your blog is a treasure trove of positivity. Keep up the amazing work! TheCore Ball is perfect for short bursts of fun. Have you tried it? Check it out!
ReplyDeleteI appreciate your practical advice and encouraging words – thank you for your blog! Experience endless entertainment with Online IO Games. Play for free and challenge players from around the world!
ReplyDeleteThis comment has been removed by the author.
ReplyDeleteFor others, massage spa in hyderabad can be a form of stress relief and a way to reconnect with their bodies. However, it's essential to approach sex spas with informed consent and an understanding of personal boundaries
ReplyDeleteAs an expert in best book publishing services, I can say that choosing the right ghostwriting team is crucial. They can transform your ideas into professionally published books that resonate with readers worldwide.
ReplyDeleteMany thanks for developing such a wonderful blog site. I love your subject. I wish your blog site continues to expand and enhance in site visitors. chase.com/verifycard activate
ReplyDeletechase.com/verifycard activate
chase.com/verifycard activate
chase.com/verifycard activate
This comment has been removed by the author.
ReplyDeleteInformation about the topic really fun and description about topic really technical work hence i like your content.
ReplyDeleteLana Del Rey Jacket
Good posts are always good to see.
ReplyDeleteLana Del Rey Jacket
yourrewardcard offers a wide range of exclusive reward cards that you won't find anywhere else. From popular brands like Amazon, Apple, and Google to niche options like Starbucks, Nike, and Adidas, there's something for everyone.
ReplyDeletefemale to male massage parlour bangalore therapy can stimulate the immune system by increasing the activity of natural killer cells and promoting the production of white blood cells, which can help to protect the body against infection and disease.
ReplyDeleteMarriott encourages electronic access, but you can request a printed copy from HR if necessary. They will guide you through the process. marriott employee login
ReplyDeleteVisitors who speak different languages can easily navigate and understand your content, which leads to a better overall experience, so be sure to install it and make your communication easier.
ReplyDeleteposted by body massage in bangalore
Your writing consistently inspires me. Thank you for sharing your insights in such an engaging and positive way. Check out this article for new insights. Geometry Dash Free offers a unique rhythm-based platforming adventure where timing and skillful navigation are essential for overcoming obstacles.
ReplyDeleteThis is extremely helpful info!! Very good work.
ReplyDeleteStylish Denim Jacket
وزن قوطی آهن به عوامل مختلفی بستگی دارد، وزن قوطی 10 در 10 از جمله ابعاد (طول، عرض، ضخامت دیوارهها) و نوع آلیاژ یا مواد
ReplyDeleteمورد استفاده در تولید آن. برای محاسبه وزن قوطی آهن، میتوان از فرمول زیر استفاده کرد:
1. فرمول محاسبه وزن قوطی آهن (پروفیل)
وزن پروفیل یا قوطی آهن با استفاده از فرمول زیر محاسبه میشود:
وزن قوطی
=
چگالی آهن
×
حجم قوطی
وزن قوطی=چگالی آهن×حجم قوطی
چگالی آهن معمولاً حدود 7.85 گرم بر سانتیمتر مکعب است.
حجم قوطی برابر است با سطح مقطع ضرب در طول آن.
This guide on installing a Google Translate button in Blogger is a game-changer for reaching a broader audience! Don't miss the latest Mission Impossible—it's a thrilling ride you can't ignore!
ReplyDeleteamazing post nuru massage in chennai
ReplyDeleteamazing post spa in chennai
ReplyDelete"Unlock growth in e-Ecommerce marketing agency UK
ReplyDeletewith strategies designed to boost engagement and drive conversions!"
If you need a very large personal loan, SoFi may be a good option. sofioffer
ReplyDeleteYour order will appear under New Products in your account until you have tapped your Breeze card to load your purchase at a station faregate, vending machine, or bus farebox. breeze card balance
ReplyDeleteIt's amazing to see online platforms embracing linguistic diversity! Using translation tools such as Google Translate guarantees inclusivity and accessibility for users all over the world. This strategy not only promotes cross-linguistic comprehension, but also builds a sense of global community. Congratulations on your efforts to promote multilingualism on your website!
ReplyDeletevirginia computer crimes act
Account Audit Service PakistanThank you very much for sharing the interesting things that will help me to increase my knowledge for writing some good poetry.
ReplyDelete"FlyQuick makes travel planning effortless and affordable, check it outcheap flights australia to canada
ReplyDelete!"
Templateism is a website offering a variety of free and premium Blogger templates. It provides stylish and customizable designs to enhance the look of Blogger websites. The templates are user-friendly and cater to different niches, such as fashion, tech, and personal blogs. Templateism aims to make it easy for bloggers to create attractive and professional-looking sites.
ReplyDeleteReal Estate Fraud Lawyer
Securities Fraud Lawyer
thanks for the great post well explained. divorce laws in virginia A criminal lawyer defends individuals and organizations accused of illegal activities, ensuring fair trials and providing legal counsel. They handle cases ranging from minor violations to serious felonies.
ReplyDeleteC'était une lecture rapide et utile. Merci encore. Explorez cet article de Géométrie Dash pour obtenir des conseils pratiques que tout le monde peut suivre. Jouer à Geometry Dash est toujours amusant. Les niveaux colorés et la musique entraînante en font un jeu dont je ne me lasse jamais.
ReplyDeleteTo install a Google Translate button on your Blogger blog, follow these step Get the Google Translate Button Code
ReplyDeleteGo to the Google Translate Website: Google Translate Tools
Click "Add to your website now".
In the configuration panel, choose the settings for the button (like language options, layout, and button style).
After selecting the options, Google will😊To excel in the pharmaceutical representative job search, start by obtaining a relevant degree and networking within the industry. Customize your resume and cover letter, highlighting your product knowledge and communication skills. Research companies thoroughly and consider informational interviews. Stay persistent and informed about industry trends to enhance your chances of securing a position.authenticnews
To install a Google Translate button in Blogger, go to the Google Translate Website, generate the widget code, and copy it. In Blogger, navigate to Layout > Add a Gadget > HTML/JavaScript, paste the code, save, and place the widget in your preferred location. Draft, review, and negotiate contracts with attention to detail. Represent clients zealously in court or alternative dispute resolution settings, ensuring their voices are heard.
ReplyDeletebest family court lawyers near me
truck accident law firm
Adding a Google Translate button to PolyTrack your Blogger site can make your content accessible to a wider audience.
ReplyDeleteMind-Blowing post with lots and lots of amazing information's I really appriciete for the great work Cheers !!! nuru massage near me
ReplyDeleteBy installing a Google convert button in Blogger, users may easily convert your blog into other languages. Navigate to Layout in your Blogger dashboard, then select Add a Gadget in the section of your choice to add this function. is soliciting a felony or misdemeanor You can generate the Google Translate widget code from the Google Translate website, then select HTML/JavaScript and paste it. The translation button will show up on your blog after you save the modifications.
ReplyDeleteStudying MBBS in Georgia offers an excellent opportunity for international students. With affordable tuition fees, high-quality medical education, and globally recognized degrees, it attracts many aspiring doctors. Georgia’s universities provide modern facilities, experienced faculty, and a diverse student environment, making it a preferred destination for pursuing MBBS in Georgia. Explore the chance to shape your medical career abroad.
ReplyDeleteThis comment has been removed by the author.
ReplyDeleteManaging academic workload can be overwhelming, especially when handling extensive research and writing tasks. Opting for an affordable business dissertation writing service UK can provide much-needed support, ensuring well-structured and high-quality dissertations. Professional assistance helps students meet deadlines, reduce stress, and focus on other academic priorities. With expert writers guiding the process, achieving academic success becomes more manageable while maintaining a healthy work-life balance.
ReplyDeleteFor Study MBBS in Kyrgyzstan for Indian Students, you must first know details about the duration of the MBBS course in Kyrgyzstan. The total duration of the MBBS course in Kyrgyzstan is 6 years. 5 years the students are given theoretical and practical training in Kyrgyzstan. In the 6th year, the medical student will have to do an internship in an affiliated hospital in Kyrgyzstan.
ReplyDeleteMBBS in Nepal is a popular choice for international students due to affordable tuition fees, quality education, and well-established medical universities. The program typically lasts 5.5 years, including a one-year internship. Students receive hands-on training and exposure to modern medical practices. The universities in Nepal are recognized by the Medical Council of India (MCI) and the World Health Organization (WHO). Graduates are eligible to pursue medical licensure exams in various countries, making it a globally recognized qualification.
ReplyDeleteHi all! I’m trying to estimate the cost of Heavy equipment hauling, but there seem to be many factors involved. I know distance, load size, and permits affect pricing, but are there hidden fees I should be aware of? Caspec Logistics offers full-service hauling, including permits and logistics, but I’d love to know if their prices are competitive. Have you worked with them or another hauler? How can I get the best deal while ensuring safe transport? Any tips on budgeting for oversized load transport?
ReplyDeleteTechnology is transforming Commercial interior design, making workspaces more efficient and interactive. Smart offices now feature automated lighting, temperature control, and advanced security systems. Many businesses are also adopting ergonomic furniture and AI-powered meeting rooms to improve productivity. These tech-driven designs enhance both functionality and comfort, creating a seamless working environment. Have you ever worked in a smart office? What technological features do you think are must-haves for a modern commercial space?
ReplyDeleteChemistry is a subject that requires both practical and theoretical knowledge, which can sometimes make assignments challenging. Chemistry Assignment Help In UK offers the perfect solution for students in need of support. With their expert tutors, you’ll receive customized help for every chemistry-related task. From understanding chemical equations to completing detailed assignments, their services ensure that you can submit high-quality work on time. Make chemistry simpler and improve your grades by choosing their reliable assignment help services.
ReplyDeleteInstalling a Google Translate button in Blogger is a great way to make your content accessible to a global audience. By adding this feature, you can ensure that readers from different countries can easily translate your blog posts into their preferred languages. It's an excellent tool for bloggers looking to reach more people and improve engagement. Additionally, for students who often need to read content in different languages, using such tools can be incredibly helpful, especially when seeking reliable Essay Writing Services from various global providers.
ReplyDeleteAdding a Google Translate button to your Blogger site is an excellent way to expand your reach and make your content accessible to a global audience. By allowing readers from different countries to translate your blog posts into their preferred languages, you can enhance engagement and attract more visitors. This feature is particularly useful for students who may need to explore resources in various languages or seek trusted dissertation writing services from providers worldwide. By implementing this tool, you ensure your content is available to a diverse range of readers, making it easier for them to access valuable academic support.
ReplyDeleteAdditionally, you can maintain your account up-to-date with just a few clicks with the tsc card accountonline platform. tsccard.accountonline.com
ReplyDeleteWhen it comes to maintaining a clean, efficient workspace, finding the right Industrial Vacuum Cleaner UAE is crucial. Many businesses in the region trust Smile Tech for their high-performance solutions. With their expertise in providing quality cleaning equipment, you can be sure you're making the right choice. If you're curious to learn more about their offerings, contact us today for more information!
ReplyDeleteCrochet Tops – your trusted source for timeless and modern crochet tops. We offer a carefully curated collection of crochet top designs that combine comfort, craftsmanship, and creativity. Whether you're searching for a breathable crochet tank top, a trendy crochet crop top, or a customizable crochet top pattern, you'll find it all right here.
ReplyDeleteNDIS Consultants are dedicated professionals who help participants make sense of their plans, understand their entitlements, and access quality supports. They advocate for their clients and tailor strategies that match each person’s unique journey.
ReplyDeleteVisit:
NDIS Consultant
NDIS Certification
NDIS Verification
How to become an approved ndis auditor
how to get ndis clients
how to become an unregistered ndis provider
This guide on installing a Google Translate button in Blogger is incredibly helpful! Making content accessible to a wider audience is so important in today’s global environment. Similarly, educational platforms like COURSEFPX focus on making academic success more accessible by offering personalized support for Capella FlexPath students. Whether it’s reaching international readers or helping students navigate their coursework, the goal is clear communication and accessibility.
ReplyDeleteThis tutorial is quite helpful for enhancing blog accessibility. Switching topics slightly, homeowners might wonder: how much does a gas compliance certificate cost? It's an important consideration for ensuring household safety and meeting legal requirements.
ReplyDelete
ReplyDeleteОткрытие Оффшорной компании
В стоимость Пакета входит оплата пошлин и комиссий в штате при регистрации новой компании.
Подготовка документов, которые являются важными в работе каждой компании:
Учредительный договор и устав компании, получение документов с официальными регистрационными номерами о регистрации Вашей компании.
Услуги юристов за рубежом
Мы предоставляем Вам юридический адрес для ведения бизнеса сроком на 1 год.
Для получения обычных писем.
Мы специализируемся на работе с международными заказчиками, всё что мы создаем для Вас предназначено для работы с иностранными клиентами, чтобы сделать процесс более легким и понятным.
Мы доставляем Вам документы.
Мы выполняем свою работу в срок, либо сообщаем заранее, если будут изменения.
Мы консультируем Вас, стараясь предоставить полную информацию.
Купить офшор
Услуги юристов за рубежом - корпоративное и налоговое право
ReplyDeleteОдним из основных направлений работы нашей компании является консультирование и сопровождение деятельности наших клиентов в иностранных юрисдикциях – в любых ее аспектах, включая налогообложение, корпоративные и договорные отношения, отношения с банками. Более того мы являемся самостоятельным лицензируемым регистратором в юрисдикциях Кипр, Англия/Шотландия, Белиз и могли бы предложить Вам наши услуги по регистрации и сопровождению компаний в данных юрисдикциях.
Краткое описание сервисов, предлагаемых нашей компанией:
Кипр
Помимо регистрации частной компании (LTD) мы также оказываем дополнительные услуги:
Регистрация публичной компании («PLC»)
Регистрация партнёрства (Limited Partnership)
Регистрация траста/фаундации/ассоциации
Приобретение готовой компании
Подготовка и подача отчетности
Виртуальный офис на Кипре
Организация реального присутствия (substance) компании на Кипре
Вопросы лицензирования различных видов деятельности
Англия/Шотландия
Купить Офшор Англия LP/LLP
Регистрация частной компании («LTD»)
Регистрация партнерства («LLP»)
Регистрация представительства в Великобритании
Регистрация ограниченного партнерства в Шотландии и Англии
Присвоение номера VAT
Получение номера EORI
Сертификат налоговой резидентности
Виртуальный офис в Великобритании
Защита компании от изменения в структуре
Штрих коды
Корпоративные номиналы для решения вопроса PSC
Белиз
Регистрация компаний
Получение лицензий для ведения деятельности на рынке FOREX
Брокерская деятельность
инструментами.
Перевод средств
Прием платежей
Депозитарные услуги
Клиринговая деятельность
Виртуальный офис по запросу
Налоговый консалтинг
Помимо услуг по регистрации и обслуживанию зарубежных компаний, среди услуг нашей компании можно выделить следующие:
1) Мы предоставляем возможность назначения наших номинальных представителей (киприоты, белизцы, сейшельцы), в том числе и в компании, которые не находятся на нашем обслуживании, как в оффшорные, так и в оншорные юрисдикции.
Если есть вопросы по номинальному сервису - обращайтесь к нам
2) Услуги по подготовке и подаче отчетности, прохождению аудита в юрисдикциях: Кипр, UK, Гонконг, Сингапур, Латвия, Мальта, Гибралтар, Болгария, Венгрия, Австрия и прочие юрисдикции по запросу
3) Открытие банковских счетов - мы специализируемся на открытии банковских счетов в таких юрисдикциях как:
Латвия, Литва, Эстония, Кипр, Швейцария, Великобритания, Гонконг, Австрия, Дания, Лихтенштейн, Люксембург, Монако, Сент-Винсент и Гренадины, более подробно на сайте.
Прайс на счет за рубежом
4) Регистрация компаний для осуществления финансовой деятельности без необходимости получения лицензии (Excluded company на Каймановых островах):
Совершение сделок с ценными бумагами и иными производными финансовыми инструментами (Dealing in securities).
5) Получение страховых лицензий (Невис).
6) Учреждение инвестиционных и частных фондов с получением лицензий (Багамские острова, Сейшельские острова, Панама, Каймановы о-вах), в том числе:
СМАРТ фонд (Specific Mandate Alternative Regulatory Test Fund) на Багамских островах.
Инвестиционный фонд на Каймановых островах.
7) Трасты
8) Оформление экономического гражданства в странах Карибского бассейна: Федерация Сент-Китс и Невис, Содружество Доминики, Антигуа и Барбуда, Гренада.
9) Юридическое сопровождение и оформление сделок с зарубежной недвижимостью.
Адвокаты по гражданскому праву
Также будем рады рассмотреть Ваши предложения по сотрудничеству.
Посетите наш сайт
Techlancers Middle East is recognized as a top web development company in Dubai, delivering websites that blend performance with creativity. We focus on building custom web solutions that are fast, secure, and designed to elevate your digital presence. From startups to enterprises, our team turns ideas into powerful, user-friendly platforms that drive real results
ReplyDeleteAdding a Google Translate button to your Blogger blog can greatly improve the accessibility of your content to an international audience. With a detailed text and logo editor, you can easily integrate this tool, making your blog more accessible to readers from around the world. After working hard to improve your blog, it's great to relax with some exciting games. For example, on the Sixty6 Promotions platform, you can find many social casinos and sweepstakes that offer a gaming experience without using real money. This is the perfect way to have fun and try something new without risking your funds. So, if you are looking for a way to relax, visit Sixty6 Promotions and enjoy the gaming experience.
ReplyDeleteThanks for the clear steps! As someone offering assignment help services in Australia, making my blog accessible to international students is crucial. This guide made adding the Google Translate button straightforward, ensuring students can read content in their preferred language. Appreciate the helpful tutorial!
ReplyDeleteChoose handmade dangle earrings for a look that stands apart. Every piece is carefully designed to capture movement, sparkle, and individuality. Perfect for women who love artistic accessories.
ReplyDeleteElevate your grow game with proper cannabis plant training. By using strategic techniques like LST, SCROG, and topping, you can dramatically increase yields and plant health. Training allows light to reach every bud site, reduces mold risk, and supports better airflow. It’s a must-do for any grower looking to optimize limited space and resources. With the right method, you’ll unlock your plant’s full potential and harvest more premium buds.
ReplyDeleteOur car wash point of sale software helps you deliver better service and operate efficiently. From contactless payments to real-time sales data, membership management, and inventory tracking, it’s the all-in-one system your business needs.
ReplyDeleteYour special commitment to getting the solution all-around became rather good and has in every case made folks much like me to achieve their ambitions. Startyourdisneyland experience.com
ReplyDeleteThanks on your marvelous posting! I definitely enjoyed reading it, you might be a great author. hulu.com/forgot email
ReplyDeleteSynaBoost is a premium dietary supplement formulated to enhance brain function and support overall cognitive well-being. buy Now :- https://synaaboost.com/
ReplyDeleteBioVanish is an advanced fat-burning supplement designed to support natural weight loss and optimize your metabolism. buy Now :- https://us-bioovanish.com/
ReplyDeleteStrong branding always starts with a clear identity, and that’s why a skilled logo designer is so important. A unique logo becomes the face of your business and sets the tone for everything else.
ReplyDeleteThis was a great read sometimes the best way to bring ideas to life is by hiring a skilled graphics designer on Upwork.
ReplyDeleteThese collections make choosing a digital get well soon card simple and thoughtful. Sometimes the right words are hard to find, but pairing them with a warm design makes all the difference. It’s wonderful how digital cards spread encouragement, especially when distance keeps us from visiting loved ones.
ReplyDeleteThis guide on how to add a Google Translate button in Blogger is excellent, clear, and easy to follow. I truly value its advantages for novices. During my work on a project concerning CIPD assignment writing help UK, I came across instructional posts like this one that exhibited a similar level of clarity. Excellent job!
ReplyDeleteBusinesses outsource their telemarketing needs to a professional company because the establishment and maintenance of an in-house telemarketing facility is in itself a challenge.Transcreation Services in Singapore
ReplyDeleteIt’s very clear and easy to follow how to add the Google Translate button on Blogger. The step-by‐step instructions make it simple even for someone who’s not very technical.
ReplyDeleteLooking forward to more useful tips like this!
Devops Training in Ameerpet Hyderabad
This comment has been removed by the author.
ReplyDeleteHello, I'm Muhammad, I'm from Pakistan. I work at Dealsexpress, where I specialize in industries like air force shoes, lifestyle, and fashion. With a keen eye for trends and quality, I help readers and customers discover the best products that blend style with comfort. My work focuses on providing insightful reviews, industry updates, and practical tips for fashion enthusiasts. Passionate about keeping people informed and stylish, I strive to make every recommendation trustworthy and relevant.
ReplyDeleteI appreciate the details provided here. A well-maintained shot blasting machine can significantly reduce abrasive consumption and operating costs. Maintenance is truly the key.
ReplyDeletehey — great tutorial! 👏
ReplyDeleteThis was super easy to follow, and the step-by-step instructions made adding the Google Translate button on my Blogger site really straightforward. Thanks for sharing!
Devops Training in Hyderabad
Really insightful post. I’ve seen many Class 12 students struggle with advanced math topics, and one-on-one sessions seem to help them grasp concepts better than group settings. A tailored Maths Tuition Class can make all the difference.
ReplyDeleteრატომ არის აუცილებელი ლოგო ტურისტული პლატფორმისთვის?
ReplyDeleteტურისტული პლატფორმა მხოლოდ ინფორმაცია არ არის — ეს არის ბრენდი, რომელიც მოგზაურებს შთაგონებას, უსაფრთხოებას და კომფორტს უნდა ანიჭებდეს. სწორედ აქ იწყებს მუშაობას ლოგო:
logos gaketeba
Understanding how global brands stay competitive requires a close look at real business practices. This discussion highlights how Unilever balances innovation, sustainability, and market expansion while adapting to changing consumer behavior. By exploring different growth models, pricing decisions, and supply chain efficiencies, readers gain practical insights into multinational strategy planning. The unilever strategy analysis explains how the company leverages digital transformation, strong brand portfolios, and ethical sourcing to maintain long-term growth. Such analysis is especially useful for business students and professionals who want to connect theoretical frameworks with real-world corporate decision-making.
ReplyDeleteThis is a very insightful post that highlights an often-overlooked aspect of teamwork. Poor coordination and communication can significantly impact productivity, morale, and overall outcomes, and the consequences of poor collaborative working can extend far beyond immediate project delays. Addressing these challenges early and encouraging open dialogue can make a real difference in achieving sustainable success. Thank you for sharing such valuable perspectives on this topic.
ReplyDeleteTata Motors follows a well-defined framework that supports efficient decision-making and smooth coordination across departments. The company operates through a mix of functional and divisional roles, allowing leadership teams to focus on specific markets, products, and regions. This approach encourages accountability while promoting collaboration between engineering, marketing, operations, and finance teams. In the middle of this system, the organisational structure of tata motors plays a key role in balancing global operations with local market needs. It enables innovation, faster responses to industry changes, and effective management of a diverse workforce across multiple countries.
ReplyDeleteFinding a reliable assignment helperin the UAE can make academic tasks much easier. Our experienced assignment helpers assist students with complex topics, tight deadlines, and detailed research work. Each helper delivers plagiarism-free, well-organized assignments that follow university standards. With the support of an assignment helper, students can manage multiple subjects more effectively and avoid last-minute pressure. The service focuses on accuracy, confidentiality, and clear communication. UAE students trust our assignment helper service to receive quality work on time while gaining a better understanding of their subjects. This professional support helps students stay confident and perform better throughout their academic journey.
ReplyDeleteThis is a very helpful and well-presented post. It explains the idea clearly and keeps the reader engaged throughout. If you are a students who are working on an equity and trust problem question and need clarity alongside practical examples. When academic workload becomes challenging, having access to proper assignment writing Help from trusted platforms such as New Assignment Help UK allows students to manage their studies effectively while benefiting from informative content like this.
ReplyDeleteThe Emily In Paris S05 Lily Collins Striped Shirt from Season 5 truly captured the essence of Parisian style. I loved how Lily Collins wore it with such confidence, making it look effortless yet fashionable. It definitely became an inspiration for my own wardrobe choices.
ReplyDeleteWhen I first wanted to try vaping, I read a lot about different devices and finally chose the pod vape. It’s a practical and modern option for anyone switching from smoking.
ReplyDeleteNice post. Thank you to provide us this useful information. Jason Momoa Jacket
ReplyDeleteI’ve been learning about different ebook publishing services, and they really simplify the publishing process for authors. From editing to formatting and cover design, everything is handled professionally. This kind of support helps ensure the ebook looks polished and is ready for readers, making it easier for authors to focus on their writing and creativity.
ReplyDeleteI focus on making economics easier for students by explaining difficult topics in a clear and practical way. I often share tips and resources for learners who need economics assignment help online in malaysia so they can manage their assignments more effectively.
ReplyDeleteOne of the key advantages of MBBS in Georgia is the availability of internationally recognized universities that offer quality education at a lower cost compared to many other countries. This makes Georgia an attractive destination for aspiring medical students.
ReplyDeleteReally helpful step‑by‑step guide on adding a Google Translate button to Blogger—making blogs multilingual like this improves accessibility, and browsing useful web tips feels even more stylish while reading in Loewe Glasses.
ReplyDeleteLoved this article! It’s great to see colleges focusing not just on academics but also on career opportunities and placements. Best Engineering college
ReplyDeleteStruggling with complex MATLAB assignments? India Assignment Help offers professional MATLAB assignment help tailored to meet academic standards. Our experts provide accurate solutions, timely delivery, and plagiarism-free work to boost your grades. Whether it’s coding, simulations, or projects, get step-by-step guidance and support. Trust India Assignment Help for affordable and reliable academic assistance today.
ReplyDeleteGreat post! I appreciate the useful insights.
ReplyDeleteinsulated tumblers
ReplyDeleteare designed to keep your drinks hot or cold for hours while maintaining durability and style. Perfect for daily use, travel, or gifting, they offer convenience, temperature control, and a sleek look for any lifestyle.
Well explained! MBBS in Georgia continues to attract students with its globally recognized degrees.
ReplyDeleteExcellent update! MBBS in Georgia is trusted by Indian students for its high academic standards.
ReplyDeleteSky Exchange is an online platform that allows users to participate in sports betting and exchange markets. It offers betting options on popular sports such as cricket, football, and tennis with real-time odds and market updates. The platform provides account access through exchange IDs and features for managing bets, balances, and betting history.
ReplyDeletesky exchange bet
sky exchanged
Installing a Google Translate button on Blogger is not so easy to have the desired solutions that bring the results to us. When I used Shellharbour Pressure Cleaning Pros I got the right results.
ReplyDeleteAdding a Google Translate button is a smart way to make a Blogger site accessible to a global audience, ensuring visitors can engage with content in their preferred nipr language. It’s a simple yet impactful step toward inclusivity.
ReplyDeleteGreat insights! MBBS in Georgia provides excellent opportunities for future medical professionals.
ReplyDeleteEssay Paperly is a reliable academic writing platform offering professional essay writing help for students across the USA. From essays and research papers to assignments and case studies, their expert writers provide plagiarism-free and well-structured content tailored to academic needs. Essay Paperly is known for affordable pricing, timely delivery, and excellent customer support, making it a trusted choice for students seeking quality academic assistance and better grades.
ReplyDeleteThis is a great tutorial on how to add the Google Translate button to Blogger! subway surfers game It's so useful for reaching a wider audience.
ReplyDeleteThe details shared here are very useful. MBBS in Georgia remains one of the most sought-after study destinations.
ReplyDeleteCompanies seeking dependable repair support can benefit from working with heavy machinery repair specialists Luton. Experienced technicians have the expertise to handle a wide range of plant equipment, including diggers, dumpers, telehandlers, and hydraulic systems. Their knowledge ensures accurate repairs and long-lasting performance.
ReplyDeleteThe demand for MBBS in Georgia continues to grow due to its internationally recognized universities and excellent teaching standards.
ReplyDeleteI truly enjoyed reading this blog. The way you explained the advantages of MBBS in Georgia makes it easier for students and parents to understand the opportunities available. Thank you for providing such reliable and useful information.
ReplyDelete